Ever felt like your home Wi-Fi is a black box, a mysterious force that simply exists? Many of us connect our devices, stream our shows, and get our work done, all while remaining blissfully (or sometimes ignorantly) unaware of the powerful hub at the center of it all: our Wi-Fi router. But what if you could pull back the curtain, step into the control room, and take command of your entire home network? Understanding how to access and configure your Wi-Fi router's settings isn't just for tech gurus—it's a fundamental skill for anyone looking to boost security, optimize performance, and troubleshoot common headaches, like when your Chromebook keeps disconnecting from Wi-Fi.
This guide will demystify the process, walking you through every step to access your router's web interface and configure key settings with confidence. Get ready to transform from a passive internet user into an active network manager.
At a Glance: Key Takeaways
- Your Router's IP Address is Key: You'll need this unique "address" to find your router on your network.
- Log In with Credentials: Like any secure system, your router requires a username and password to access its settings.
- The Web Interface is Your Command Center: This browser-based portal is where all the magic happens.
- Security First: Immediately change default login credentials and Wi-Fi passwords.
- Optimize for Performance: Adjusting settings like DNS can significantly improve your browsing experience.
- Stay Updated: Regular firmware updates are crucial for security and optimal performance.
- Don't Fear the Reset Button: It's your last resort for regaining access, restoring factory defaults.
Why Bother? The Power of Your Home Network is in Your Hands
Think of your Wi-Fi router as the digital heart of your home. Every internet-connected device, from your smartphone to your smart thermostat, communicates through it. Without proper configuration, you might be exposing your network to security risks, enduring slower-than-necessary speeds, or struggling with unreliable connections.
Taking control of your router's configuration allows you to:
- Boost Security: Change default passwords, enable stronger encryption, and prevent unauthorized access.
- Improve Performance: Optimize Wi-Fi channels, prioritize certain devices (QoS), and even use faster DNS servers.
- Enhance Control: Set up guest networks, implement parental controls, and manage connected devices.
- Troubleshoot Effectively: Diagnose and fix issues, whether it's a slow connection or a specific device like your laptop experiencing persistent Wi-Fi dropouts.
Your Router's Command Center: The Web Interface
Every Wi-Fi router comes with an administrative web interface—a specialized website built directly into the device itself. You access this interface through a standard web browser, just like you would any other website. Once you log in, you'll find a dashboard filled with options to manage your entire network. This is where we're headed.
Step 1: Unearthing Your Router's Digital Address (IP)
Before you can log in, you need to know your router's unique identifier on your network: its IP address. This is often referred to as the "Default Gateway" because it's the gateway for all your internet traffic. While many routers share common default IPs, it's best to confirm yours.
Finding Your Router's IP Address on Windows
Windows offers a couple of straightforward ways to find this information.
For Windows 11 Users:
- Click the
Startbutton and selectSettings(the gear icon). - Navigate to
Network & interneton the left sidebar. - Scroll down and click
Advanced network settings. - Find and click
Hardware and connection properties. - Look under either
Ethernet(if you're wired) orWi-Fi(if you're wireless) for the entry labeledDefault Gateway. The numbers next to it are your router's IP address.
For Windows 10 Users: - Click the
Startbutton and selectSettings. - Go to
Network & internet. - Ensure
Statusis selected in the left pane. - Scroll down and click
View hardware and connection properties. - Similar to Windows 11, locate
Default Gatewayunder your active connection (EthernetorWi-Fi).
Using the Command Prompt (Windows 10 & 11):
This method is quick and universally applicable across recent Windows versions. - Press the
Windows key + Rto open the Run dialog, typecmd, and pressEnter. This will open the Command Prompt. - In the Command Prompt window, type
ipconfigand pressEnter. - Scroll through the output. Look for your active network adapter (
Ethernet adapterif wired, orWireless LAN adapter Wi-Fiif wireless). - Under your active adapter, you'll find
Default Gateway. The series of numbers (e.g.,192.168.1.1) is your router's IP address.
Locating Your Router's IP Address on a Mac
Mac users have a similarly simple path through their system settings.
- Click the
Apple iconin the top-left corner of your screen. - Select
System Settings(orSystem Preferenceson older macOS versions). - In the System Settings window, click on
Wi-Fiin the left sidebar. - Click
Detailsnext to the name of your currently connected Wi-Fi network. - Select the
TCP/IPtab in the details window. - Your router's IP address will be listed next to
Router.
The Usual Suspects: Common Router IP Addresses
If all else fails, or you're just looking for a quick guess, these are the most common IP addresses used by routers:
192.168.1.1(Very common: Linksys, TP-Link, Asus, Synology)192.168.0.1(Common: Netgear, D-Link, older Linksys)192.168.2.1(Less common: Belkin)10.0.0.1(Often used by Xfinity/Comcast equipment)
You can try entering one of these into your browser's address bar. If it loads a router login page, you've found it!
Step 2: Making the Initial Connection (Physical & Wireless)
Before diving into the software, a quick physical check-up ensures everything is properly connected. This is especially important during an initial setup or after a network issue.
Understanding Your Router's Ports
Take a moment to familiarize yourself with the ports on the back of your router:
- WAN Port (RJ45, often blue or distinct color): This is the most crucial port for your internet connection. It's where your router connects to your ISP's modem (for cable or fiber internet). This port receives the internet signal from outside your home.
- DSL Port (RJ11/RJ12, smaller than WAN): If you have DSL internet, this port connects directly to your telephone line. Often, you'll need a DSL filter or splitter to separate the phone and internet signals.
- LAN Ports (RJ45, often yellow, numbered 1-4): These "Local Area Network" ports are for wired connections within your home network. You'd connect devices like desktop computers, network-attached storage (NAS) drives, printers, or a network switch here using Ethernet cables.
- USB Port: Some routers include USB ports. These can be used for connecting external hard drives to create network storage, connecting a printer to become a network printer, or sometimes for initial setup or 4G/5G dongles. Their function varies by model.
Powering Up and Connecting Your Computer
- Connect to Your ISP's Modem: Ensure your router's WAN port is connected via Ethernet cable to your ISP's modem. If you have a router/modem combo unit, this connection is internal. For DSL, ensure the DSL port is connected to your phone line.
- Power On: Plug in your router and press the power button if it has one. Wait a few minutes (typically 2-5) for the router to fully boot up. Watch for indicator lights on the front, which typically show power, internet connectivity, and Wi-Fi activity.
- Connect Your Computer:
- Wired Connection (Recommended for initial setup): For maximum reliability, connect your computer directly to one of your router's LAN ports using an Ethernet cable. This ensures a stable connection while you make changes, especially if you're altering Wi-Fi settings.
- Wireless Connection (If Ethernet isn't an option): If you can't connect with a cable, join the router's default wireless network. The default
SSID(network name) andWi-Fi passwordare usually printed on a label on the bottom or back of the router.
Step 3: Gaining Entry: Logging Into Your Router's Brain
With your router's IP address in hand and your computer connected, you're ready to access the web interface.
- Open Your Web Browser: Use any standard web browser (Chrome, Edge, Firefox, Safari, etc.).
- Enter the IP Address: In the address bar at the very top of the browser window, type the router's IP address you found in Step 1 (e.g.,
192.168.1.1) and pressEnter. Do not include "http://" or "www." unless it automatically adds it. - Login Prompt: You should now see a login screen, asking for a
UsernameandPassword.
The Hunt for Default Credentials
This is often the trickiest part for first-timers. Routers come with default login credentials straight out of the box.
- Check the Router Label: Your best bet is always the router itself. Look for a sticker on the bottom, back, or side. It often lists the
Admin UsernameandPassword, sometimes simplyLoginorCredentials. - Consult the Manual: If the label isn't there or is unreadable, check the physical manual that came with your router or search for a digital version online (e.g., "Netgear R7000 manual PDF").
- Common Default Combinations: Many manufacturers use standard defaults. Here are some of the most frequent:
admin / adminadmin / passwordadmin / [blank](meaning no password, just leave it empty)user / userroot / admin
Here are common brand-specific defaults:- Asus: IP:
192.168.1.1| Username:admin| Password:admin - Belkin: IP:
192.168.2.1| Username:admin| Password:admin - D-Link: IP:
192.168.0.1| Username:admin| Password:[blank](oradmin) - Linksys: IP:
192.168.1.1| Username:admin| Password:admin - Netgear: IP:
192.168.0.1| Username:admin| Password:password - Synology: IP:
192.168.1.1| Username:admin| Password:admin - TP-Link: IP:
192.168.1.1| Username:admin| Password:admin
If you’re unsure, a quick online search for "[Your Router Brand/Model] default login" can be incredibly helpful.
Lost Your Password? Time for a Reset
What if you or someone else changed the router's login password and you can't remember it? Don't panic. You have a powerful tool at your disposal: the reset button.
- Find the Reset Button: This is usually a small, recessed button (sometimes labeled
Reset) on the back or bottom of your router. It's often so small you need a pointed object like a paper clip or a pen tip to press it. - Perform the Reset: With the router powered on, press and hold the reset button for about 10-15 seconds. You'll usually see the router's lights flash or change patterns, indicating it's resetting.
- Wait for Reboot: Release the button and wait a few minutes for the router to fully reboot.
- Log In with Defaults: Once rebooted, the router will be restored to its factory default settings. This means you can now log in using the original default username and password that came with the router (check the label again!). You'll then need to reconfigure your internet and Wi-Fi settings.
Step 4: Mastering Your Network: Essential Configurations
Congratulations! You're now inside your router's administrative interface. While the exact layout and naming conventions vary between brands, the core functions are largely the same. Here are the critical settings you should configure.
1. Secure Your Throne: Change Router Admin Username and Password
This is the absolute first thing you should do after gaining access. The default credentials are a massive security vulnerability. If hackers know your router model, they can easily guess these defaults and take control of your network.
- Where to Find It: Look for sections like
Administration,System Tools,Security,Management, orSettings > Admin Password. - The Change: You'll typically be prompted to enter the old username/password (which are the defaults) and then create a new, strong username and password.
- New Username: Avoid common choices like "admin" or your first name. Make it unique.
- New Password: Use a strong, complex password or, even better, a passphrase (a series of unrelated words). Consider using a password manager to generate and store it securely.
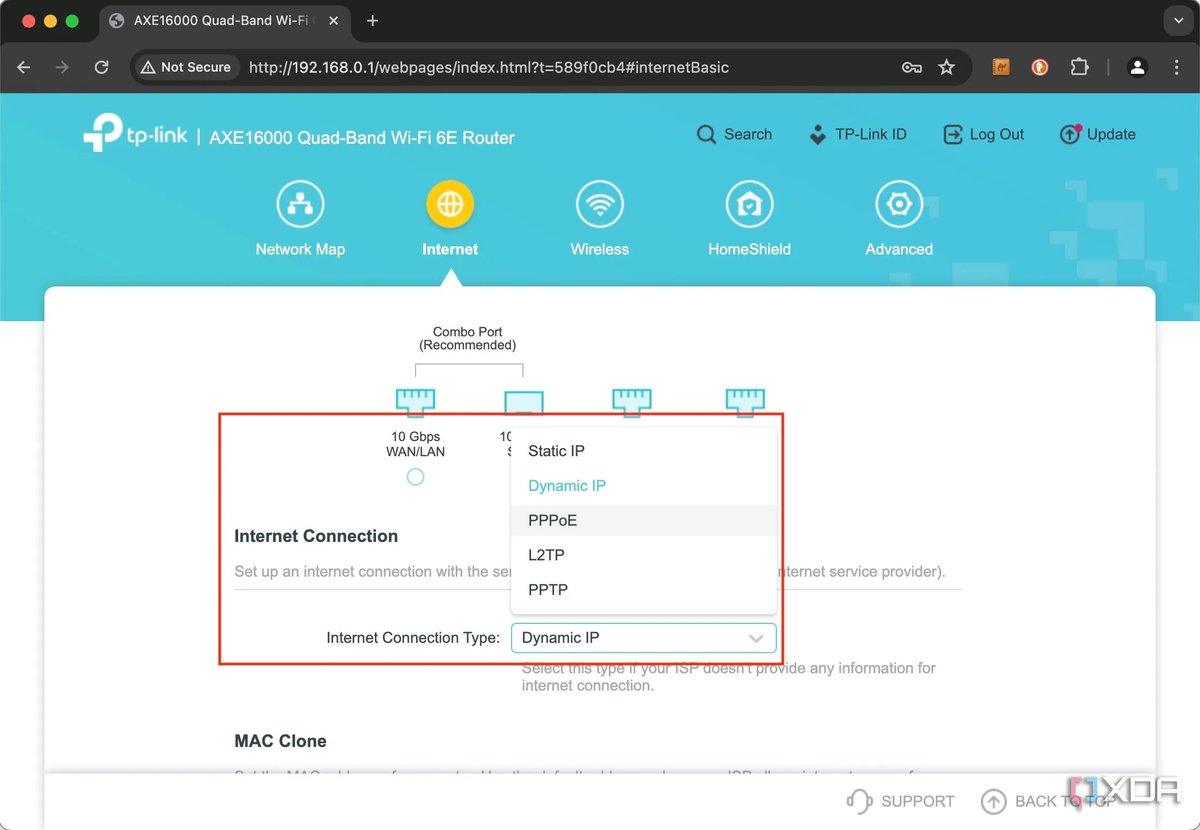
2. Hooking Up to the Internet: Set Up Your Internet Connection (WAN)
If you're setting up a new router or have just reset it, you'll need to tell it how to connect to the internet provided by your ISP. For many, especially those with cable or fiber internet, this might already be handled automatically via Dynamic IP (DHCP). However, some ISPs, particularly for DSL services, require specific credentials.
- Where to Find It: Look for
Internet,WAN, orNetwork Settings. - Configuration:
- Dynamic IP (DHCP): Most common for cable/fiber. Your router automatically gets an IP address from your modem.
- PPPoE (Point-to-Point Protocol over Ethernet): Common for DSL. You'll need a
UsernameandPasswordprovided by your ISP. Enter these carefully. - Static IP: Less common for home users, requires specific IP, subnet mask, gateway, and DNS settings from your ISP.
3. Crafting Your Wireless World: Configure Wireless Network Settings
This is where you customize your Wi-Fi network's identity and security. You'll typically find this under a Wireless, Wi-Fi, or WLAN section.
- Change the Wireless SSID (Network Name):
- Where to Find It: Look for
Wireless Network Name,SSID, orBasic Wireless Settings. - The Change: Change the default network name (e.g., "TP-Link_1234") to something unique and recognizable for your home. Avoid using personal information. Making your SSID unique helps you identify your network easily and avoid confusion with neighbors.
- Set Strong Security (Encryption):
- Where to Find It: Usually in the same
Wirelesssection, labeledSecurity,Encryption, orWireless Mode. - The Change: Always choose the strongest encryption available.
- WPA2-PSK [AES]: This is the minimum acceptable security standard for most modern routers. Ensure you select
AESas the encryption type, notTKIP(which is older and less secure). - WPA3: If your router is newer (Wi-Fi 6, 6E, or 7 compatible) and supports it,
WPA3offers even stronger encryption and better protection against specific attacks. Use it if available. - Avoid WEP and WPA/WPA-PSK (TKIP): These older standards are easily crackable and should never be used.
- Change the Wireless Key (Wi-Fi Password):
- Where to Find It: Often labeled
Wireless Password,PSK Key,Passphrase, orNetwork Keywithin theWireless Securitysection. - The Change: Create a new, strong Wi-Fi password. It should be different from your router's admin password. Aim for a combination of uppercase and lowercase letters, numbers, and symbols, or a memorable passphrase.
- Disable WPS (Wi-Fi Protected Setup):
- Where to Find It: Look for a
WPSsection, usually near your main wireless settings. - The Change: WPS (the button on your router that allows devices to connect without entering a password) has known security vulnerabilities. Disabling it adds another layer of protection. It might be less convenient for connecting new devices, but the security gain is worth it.
- Important Note: If you're connected to the router wirelessly, applying changes to your
SSIDorWireless Keywill immediately disconnect your device. You'll need to reconnect to the newly named network using your new Wi-Fi password.
4. Supercharging Your Browsing: Optimize DNS Servers
The Domain Name System (DNS) is like the internet's phonebook, translating website names (like google.com) into IP addresses that computers understand. Your ISP's default DNS servers might not be the fastest or most privacy-friendly.
- Where to Find It: Look for
WAN,Internet,Network, orDHCP settings, sometimes underAdvanced. You might seeDNS Server Settings. - The Change: You can manually specify different DNS servers.
- Recommended (Cloudflare DNS):
Primary DNS server: 1.1.1.1Secondary DNS server: 1.0.0.1- Other Options: Google DNS (
8.8.8.8/8.8.4.4), OpenDNS. - Benefit: Changing DNS can lead to faster website loading, improved privacy (depending on the provider), and sometimes even block malicious sites.
5. Keeping It Fresh & Secure: Update Firmware
Firmware is the operating system of your router. Manufacturers regularly release updates to fix security vulnerabilities, improve performance, add new features, and resolve bugs (like potential connectivity issues that might cause a Chromebook to disconnect from Wi-Fi).
- Where to Find It: Look for
Firmware Update,System Upgrade, orAdministrationunder anAdvancedsection. - The Change:
- Check for Updates: Many modern routers have an "Check for New Firmware" button that downloads and installs updates automatically.
- Manual Update: For older routers, you might need to manually download the firmware file from your router manufacturer's website (ensure you get the correct model and version!) and then upload it through the interface.
- Best Practice: Update your firmware regularly, ideally every few months or whenever a critical update is released. Ensure your router remains powered on and stable during the update process.
6. Your Safety Net: Create a Configuration Backup
After spending time customizing your settings, the last thing you want is to lose them all due to a power outage or an accidental reset.
- Where to Find It: Look for
Backup,Restore,Configuration, orSystem ToolsunderAdministrationorAdvanced. - The Change: Click the
BackuporSave Configurationbutton. Your router will download a small file (usually.confor.binformat) to your computer. Store this file in a safe place. If you ever need to reset your router, you can simply upload this file to restore all your custom settings in minutes.
7. Beyond the Basics: Other Useful Settings
Once you've tackled the essentials, explore these options to further customize your network:
- Guest Network: Create a separate Wi-Fi network for visitors. This keeps your main network password private and isolates guest devices from your primary network resources, enhancing security.
- Parental Controls: Block specific websites, restrict internet access during certain hours, or filter content for specific devices.
- QoS (Quality of Service): Prioritize certain types of traffic (e.g., video streaming or online gaming) over others to ensure a smoother experience for critical applications.
- Attached Devices (DHCP Client List): See a list of all devices currently connected to your network, often showing their IP and MAC addresses. This is useful for monitoring and troubleshooting.
Troubleshooting Common Hurdles
Even with a clear guide, sometimes things don't go as planned. Here are quick tips for common issues:
- "Page Not Found" or "Can't Reach This Page": Double-check the IP address you entered. Make sure your computer is connected to the router (wired or wirelessly). Try clearing your browser's cache.
- Login Failed: Triple-check your username and password. Remember, they are case-sensitive. If you've tried all defaults and can't recall a custom password, a full factory reset is your next step.
- No Internet After Configuration:
- Check your
WAN/Internetsettings again. Did you enter the correct PPPoE credentials if required? - Is the WAN cable securely connected to your ISP's modem?
- Try power cycling both your modem and router (unplug both for 30 seconds, then plug the modem back in, wait for it to fully boot, then plug the router back in and wait).
- Wi-Fi Disconnects After Changing Settings: This is normal if you changed the SSID or Wi-Fi password. Simply reconnect your device to the new network name using the new password. If you're still having issues, perhaps your Chromebook is having specific Wi-Fi connection problems that require device-specific troubleshooting.
When Things Go Sideways: The Factory Reset
We mentioned this before, but it's worth reiterating the power and purpose of the factory reset. While it's inconvenient to re-enter all your settings, it's a reliable way to solve many router configuration problems, especially when you're locked out.
Remember: A factory reset wipes all your custom settings—your Wi-Fi name and password, admin password, port forwarding rules, parental controls, and anything else you configured. Treat it as a fresh start. Make sure you have your ISP's internet login details handy (if required) before you perform one.
Pro Tips for a Healthier Network
- Apply Changes Diligently: Always click
Apply,Save, orOKafter making any change in the router interface before navigating to a different screen or closing your browser. Otherwise, your changes might not take effect. - Consult Your Manual (or Manufacturer Website): While this guide provides general steps, your specific router model might have unique options or a slightly different interface. When in doubt, refer to your manufacturer's documentation.
- Utilize Setup Wizards: Many newer routers include a step-by-step setup wizard that guides you through the initial configuration process. These can be very helpful for basic settings.
- Physical Placement Matters: While not a configuration setting, remember that router placement significantly impacts Wi-Fi performance. Central, elevated locations, away from obstructions and other electronics, are usually best.
Take Control: Your Network, Your Rules
Accessing your Wi-Fi router and diving into its network configuration might seem daunting at first, but with the right guidance, it's a perfectly manageable task. By taking these steps, you're not just changing settings; you're gaining a deeper understanding of your home network, improving its security, and ensuring a smoother, more reliable online experience for every device. So go ahead, log in, and make your Wi-Fi truly your own.